One evening, I realized I don’t really know how an operating system works. I know what it does from uni, but I have no clue how to create one from scratch. So here we are, learning a bit more about the kernel together!
preface
We’ll slowly go over how we create a RISC-V kernel from scratch using Rust, a bit of scripting, and a bit of assembly. Don’t worry: we’ll keep the assembly short, and you’ll find it surprisingly easy :).
RISC-V is known as an instruction set architecture (ISA). An ISA is an abstract model that defines the CPU’s programmable interface, letting software interact with hardware. Why RISC-V? You might ask.
For one, it’s free and open-source, and that should be THE reason. Because it’s free and open-source, we have tons of materials to look at online. But the most important reason, for me at least, is that xv6 exists, and it’s an excellent resource for beginners to start learning and implementing their own kernel.
That said, our kernel will be based on xv6, with a few switches in algorithms and data structures to make things interesting. At the end of the day, we’ll learn not only more about writing a kernel but also more about low-level Rust.
Remember, I’m by no means an expert on this topic. Check out the posts from people who know way more about these topics.
- Everything You Never Wanted To Know About Linker Script
- The Adventures of OS: Making a RISC-V Operating System using Rust
- Writing an OS in Rust
prerequisites
Before we can start writing our kernel, we need to set up our RISC-V dev environment. I don’t remember the exact prerequisites for getting your machine ready, but these steps should be enough to get started.
All commands are only applicable on Linux systems. Consult the docs if you use a different operating system.
rustup default nightly
rustup target add riscv64gc-unknown-none-elf
Assuming you’re familiar with Rust and have rustup installed, run the commands above to get the Rust nightly channel and the riscv64gc-unknown-none-elf target.
nightlyenables thecustom_test_frameworkfeature, allowing us to create tests that run directly on the hardware.riscv64gc-unknown-none-elftargets no specific vendor, no specific operating system, and creates ELF binaries.
We also need the RISC-V toolchain from riscv-gnu-toolchain. Build the toolchain from source by running these commands.
./configure --prefix=/opt/riscv --with-arch=rv64gc --with-abi=lp64d
make
The compiled toolchain supports
- the (g)eneral purpose extension
- the (c)ompressed instructions extension
lp64dapplication binary interface (ABI)newlibstandard library for bare-metal
Building from source also requires a few other things to be installed on your machine.
These are mostly provided by the build-essential package on Debian or the base-devel package on Arch.
Once the toolchain is installed, add its path to your PATH environment variable.
export RISCV="/opt/riscv"
export PATH="$RISCV/bin:$PATH"
Finally, you’ll need QEMU to run the kernel on virtual hardware. Head over to https://www.qemu.org/download/ to see how to get QEMU on your machine.
I installed QEMU with this command.
pacman -S qemu-full
unstudded
Like any other Rust project, we start with cargo new.
I call my project reve.
cargo new reve
We first tell cargo that this project uses the nightly channel by creating rust-toolchain.toml.
[toolchain]
channel = "nightly"
By default, the project compiles for whatever platform we’re on. To create a bare-metal program that runs directly on RISC-V hardware, tell Cargo to cross-compile to the target we installed earlier.
Create .cargo/config.toml and specify the target we want.
[build]
target = "riscv64gc-unknown-none-elf"
If we run cargo build now, we get the following errors.
error[E0463]: can't find crate for `std`
  |
  = note: the `riscv64gc-unknown-none-elf` target may not support the standard library
  = note: `std` is required by `reve` because it does not declare `#![no_std]`

error: cannot resolve a prelude import

error: cannot find macro `println` in this scope
 --> src/main.rs:2:5
  |
2 |     println!("Hello, world!");
  |     ^^^^^^^

error: `#[panic_handler]` function required, but not found

For more information about this error, try `rustc --explain E0463`.
error: could not compile `reve` (bin "reve") due to 4 previous errors
By default, Rust use prelude::* which includes things like the println! macro, so we don’t have to import the frequently used items manually.
Many of these require the standard library, which isn’t available because std depends on an operating system.
We fix these and a few more errors with a new src/main.rs.
#![no_main]
#![no_std]

use core::panic::PanicInfo;

/// Handle any panic that occurred on a CPU
/// by reporting it and aborting execution.
#[panic_handler]
fn panic(_info: &PanicInfo) -> ! {
    abort()
}

/// Abort execution with an infinite loop,
/// preventing the CPU from continuing.
fn abort() -> ! {
    loop {
        core::hint::spin_loop();
    }
}
In addition to the no_std attribute, we also add the no_main attribute to tell Rust not to generate the entry point that initializes the runtime before calling main.
Since the default entry point also needs the standard library, we can’t compile with the generated entry point.
We’ll define our own entry point later to fix this new warning from the linker.
warning: linker stderr: rust-lld: cannot find entry symbol _start; not setting start address
 |
 = note: `#[warn(linker_messages)]` on by default

warning: `reve` (bin "reve") generated 1 warning
    Finished `dev` profile [unoptimized + debuginfo] target(s) in 0.00s
qemu
When our kernel is ready, we’ll run it with the following QEMU command.
qemu-system-riscv64 \
  -machine virt \
  -m 128M \
  -cpu rv64 \
  -smp 4 \
  -echr 2 \
  -nographic \
  -bios none \
  -kernel target/riscv64gc-unknown-none-elf/debug/reve
This starts the virt machine with 128M of memory and 4 hardware threads.
QEMU runs in the terminal without a graphical interface when we use -nographic, and we set -echr 2 to switch the escape sequence to Ctrl+B.
We set -bios none to tell QEMU not to use any firmware at startup.
Instead, it should load the file at the path given to -kernel.
Once the kernel loads, all CPUs jump to the address 0x8000_0000 and start executing instructions from there.
This raises a few questions.
First, how does QEMU know where to load the kernel in memory? Second, how do we place instructions at 0x8000_0000 so the machine starts running our kernel?
linker
When we run cargo build, it creates an ELF file with metadata that tells the loader how to load our program into memory.
Creating an ELF typically involves 3 steps: compiling source code to assembly instructions (.S), assembling instructions into objects (.o), and linking objects into the final output.
Normally, the toolchain automatically links objects into the final binary to meet the OS standard. With the kernel, we have to define how to link them with a linker script.
We’ll create a linker script specifically for the virt machine in QEMU to keep it simple.
OUTPUT_ARCH(riscv)

/* for reasons, QEMU jumps to 0x8000_0000 instead of the address of the entry
 * point provided by the ELF file, but we still need to point the linker to
 * the entry point for it to work properly
 */
ENTRY(_entry)

MEMORY {
    ram : ORIGIN = 0x80000000, LENGTH = 128M
}

PHDRS {
    /* ... */
}

SECTIONS {
    /* ... */
}
Physically, we have 128M of memory starting at 0x8000_0000, where the loader copies the ELF file’s contents.
Physical memory starts at 0x8000_0000 because addresses below that are reserved for I/O devices.
We first define program headers to group the output sections into segments.
PHDRS {
    text PT_LOAD;
    rodata PT_LOAD;
    rwdata PT_LOAD;
}
Segments are collections of sections that share the same memory access permission, and sections are groups of related code objects.
We have 3 segments as defined by the PHDRS:
textcontains executable datarodatacontains read-only datarwdatacontains writable data
We then define the content of each section and which segment it goes into.
SECTIONS {
    PROVIDE(_mem_size = LENGTH(ram));
    PROVIDE(_mem_addr = ORIGIN(ram));

    .text : {
         *(.text.init) *(.text .text.*)
    } >ram :text

    .rodata : {
         . = ALIGN(4096);
         PROVIDE(_rodata_addr = .);
         *(.srodata .srodata.*) *(.rodata .rodata.*)
    } >ram :rodata

    .data : {
         . = ALIGN(4096);
         PROVIDE(_data_addr = .);
         *(.sdata .sdata.*) *(.data .data.*)
    } >ram :rwdata

    .bss : {
         . = ALIGN(4096);
         PROVIDE(_bss_addr = .);
         *(.sbss .sbss.*) *(.bss .bss.*)
    } >ram :rwdata

    . = ALIGN(4096);
    PROVIDE(_stack_addr = .);
    PROVIDE(_heap_addr = _stack_addr + 0x10000);
}
We have 4 output sections as defined by SECTIONS:
.textcontains CPU instructions.rodatacontains constants.datacontains initialized global variables.bsscontains uninitialized global variables
More importantly, we can define how each section of the kernel ELF is loaded into memory.
.textsection stays at the base address, with objects in.text.initalways loaded first.rodatasection follows at the next page-aligned address.dataand.bsssections come last at the next page-aligned address
Each section starts at a page-aligned address, and the linker script assigns its address to various linker-script symbols. These symbols can later be used in Rust code as needed.
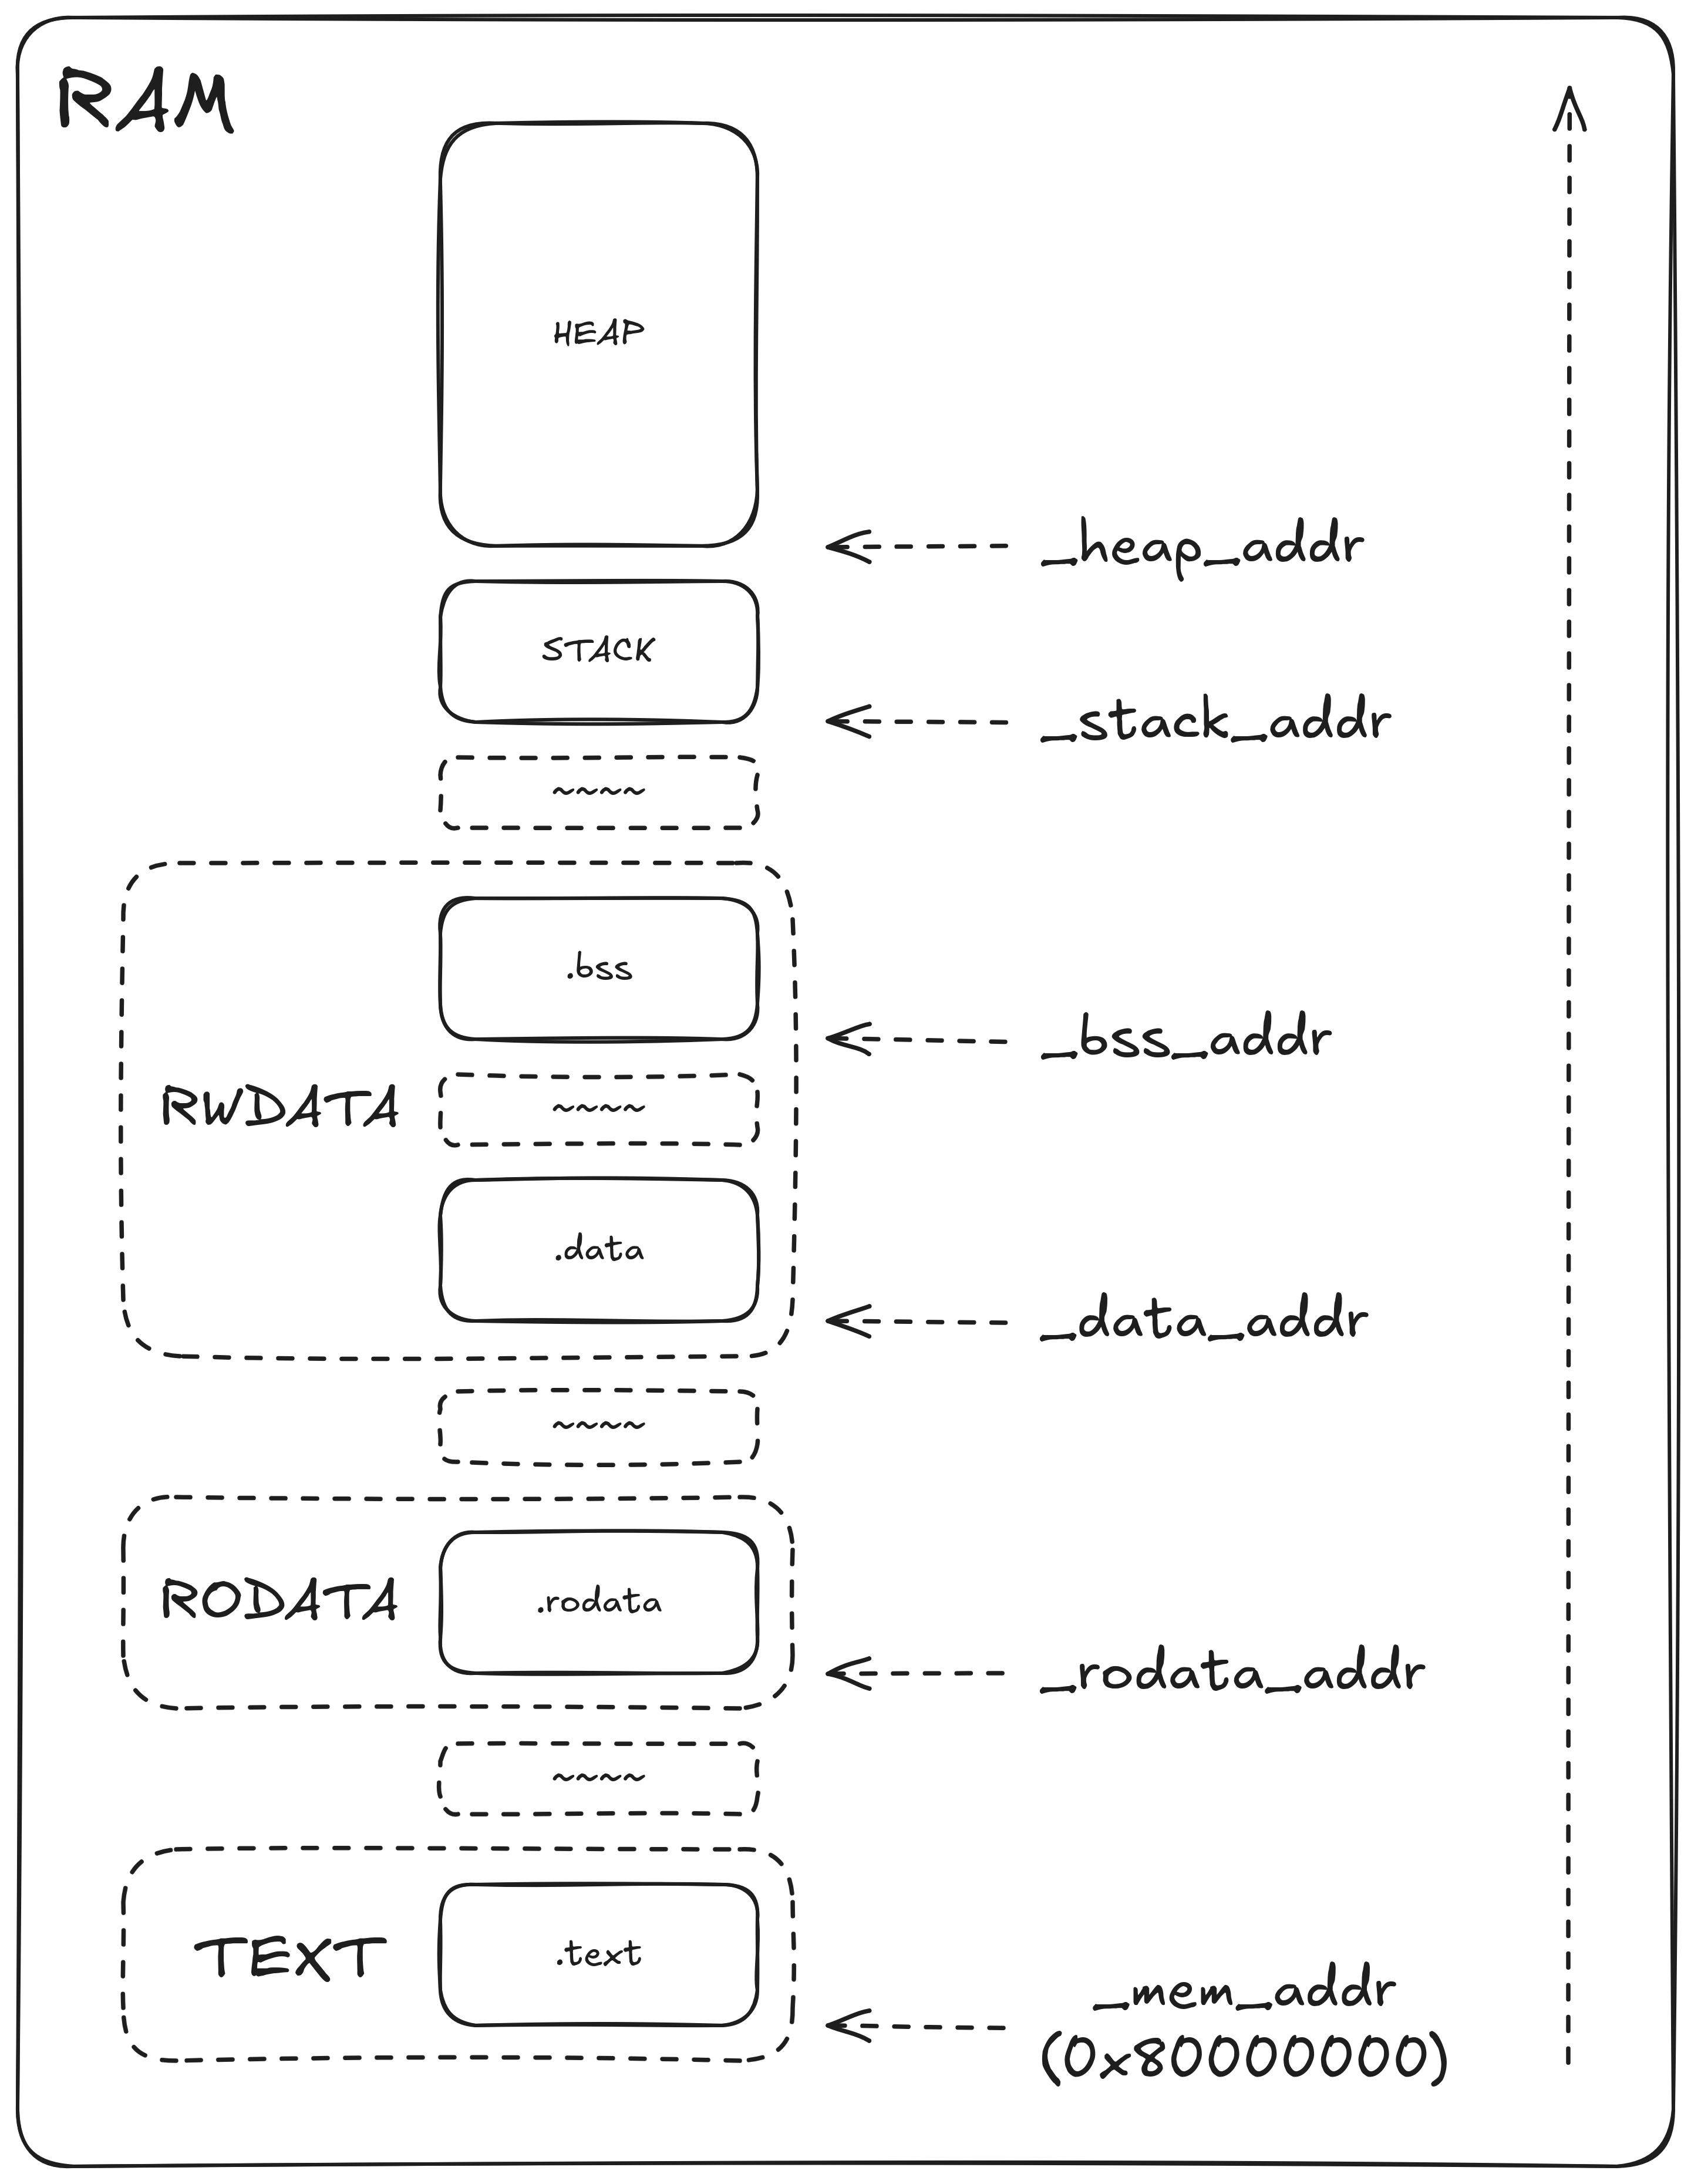
Physical memory layout
Before we continue, update .cargo/config.toml so that the linker script virt.ld is used and the resulting binary is run with QEMU instead of the default runner.
[build]
target = "riscv64gc-unknown-none-elf"

[target.riscv64gc-unknown-none-elf]
rustflags = [
  '-C', 'link-arg=-Tvirt.ld',
]
runner = """\
qemu-system-riscv64 \
-machine virt \
-m 128M \
-cpu rv64 \
-smp 4 \
-echr 2 \
-nographic \
-bios none \
-kernel"""
entrypoint
Following xv6’s footsteps, our kernel will manually set up the system in machine mode before switching into supervisor mode. RISC-V has multiple privilege levels, and each CPU executes in one privilege mode at a time, alternating between modes. A CPU running in a lower privilege mode can’t execute instructions that require a higher privilege. The privileges from the highest to the lowest level are:
- Machine mode: all instructions are allowed
- Supervisor mode: privileged and non-privileged instructions
- User mode: non-privileged instructions
Access to privileged instructions allows supervisor mode to control the memory management unit, handle interrupts, etc. Software running with privileged instructions is in kernel space, while software running without privileged instructions is in user space.
warning: linker stderr: rust-lld: cannot find entry symbol _entry; not setting start address
  |
  = note: `#[warn(linker_messages)]` on by default

warning: `reve` (bin "reve") generated 1 warning
    Finished `dev` profile [unoptimized + debuginfo] target(s) in 0.10s
To fix the linker warning, we’ll define _entry.
We also need to tell Rust that _entry must be placed in the section named .text.init using the link_section attribute (remember that .text.init is the first thing to be loaded at 0x8000_0000).
_entry must be the only thing in .text.init since the linker doesn’t guarantee the order of objects within a section.
use core::{arch::naked_asm, panic::PanicInfo};

#[unsafe(link_section = ".text.init")]
#[unsafe(naked)]
#[unsafe(no_mangle)]
extern "C" fn _entry() {
    // Set the stack pointer to (0x4000 * (mhartid + 1)).
    // We set the stack pointer to the highest address because it grows
    // from the highest address to the lowest address.
    naked_asm!(
        "la sp, _stack_addr", // sp = _stack_addr
        "la a0, 0x4000",      // offset = 0x4000
        "csrr a1, mhartid",   // cpuid = mhartid
        "addi a1, a1, 1",     // cpuid += 1
        "mul a0, a0, a1",     // offset *= cpuid
        "add sp, sp, a0",     // sp += offset
        "call minit",         // minit()
        "mret",
    )
}
We define _entry as a naked function whose entire body consists of the assembly block defined by the naked_asm macro.
The compiler does not add any special handling for arguments or return values to naked functions.
Before we can jump into the Rust side of the code, we must set up the stack so function calls work properly. Each CPU gets 16KB of memory from the 64KB stack section we designated for the kernel to be used during boot.
#[unsafe(no_mangle)]
extern "C" fn minit() {
    // address of the SiFive test device
    const SIFIVE_BASE: usize = 0x10_0000;
    // writing 0x5555 to the device tells it to shut down the machine
    unsafe {
        core::ptr::write_volatile(SIFIVE_BASE as *mut u32, 0x5555);
    }
    abort();
}

fn abort() -> ! {
    loop {
        core::hint::spin_loop();
    }
}
Once the stack is ready, each CPU calls minit to set up the system in machine mode.
We’ll get to the setup steps another time.
For now, we shut down the machine by writing to the memory-mapped address of the SiFive test device on virt.
shutdown
cargo run should now start QEMU, which exits immediately with no error.
If we don’t write 0x5555 to the test device and run cargo run again, it’ll hang forever.
We’ll later initialize the system in machine mode and implement a few key data structures to support our kernel.
And that’s it! We have our first kernel. It doesn’t do much, but it was pretty exciting to see it all work out.
still here?
You will probably want to add this to Cargo.toml so rust-analyzer stops complaining about a missing test crate.
test is the crate for the project’s test binary.
Right now, Rust doesn’t know how to test on our target.
[[bin]]
name = "reve"
bench = false
doctest = false
test = false